1. EC2 instances
Amazon Elastic Compute Cloud (Amazon EC2) provides scalable computing capacity in the Amazon Web Services (AWS) cloud. This service allows you to configure and rent computers to meet your compute needs on an as needed basis. Using EC2 eliminates the need to invest in hardware up-front. EC2 can be used to launch as many or as few virtual servers needed, configure security and networking, and manage storage. Amazon EC2 enables scaling up or down to handle changes in requirements or spikes in popularity, reducing the need to forecast traffic.
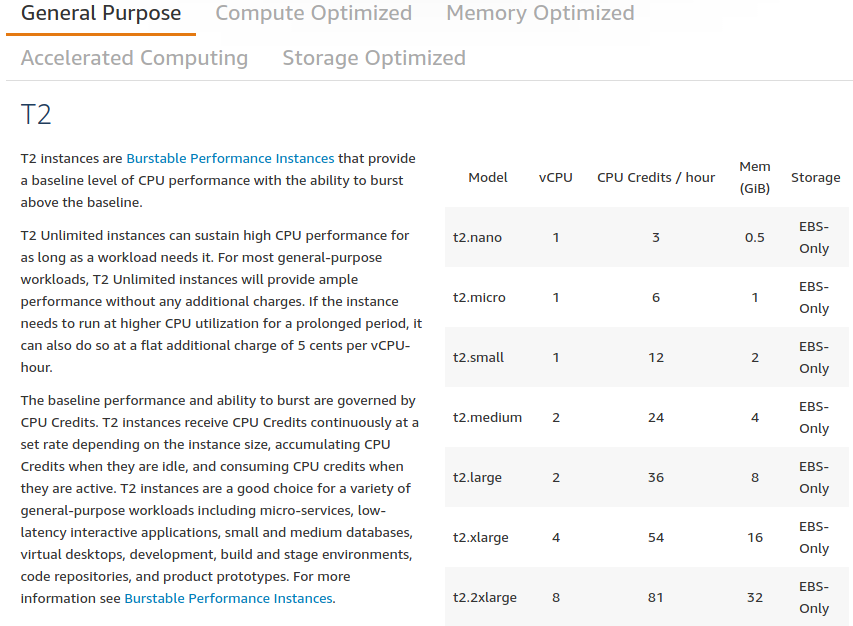
Instance come in various shapes and sizes. Some instances might be geared towards running CPU intensive tasks while other might be optmized for memory or storage. Some of the different options available are shown in the figure below and more information can be found here.
The following sections outline the various steps involved in setting up an EC2 instance:
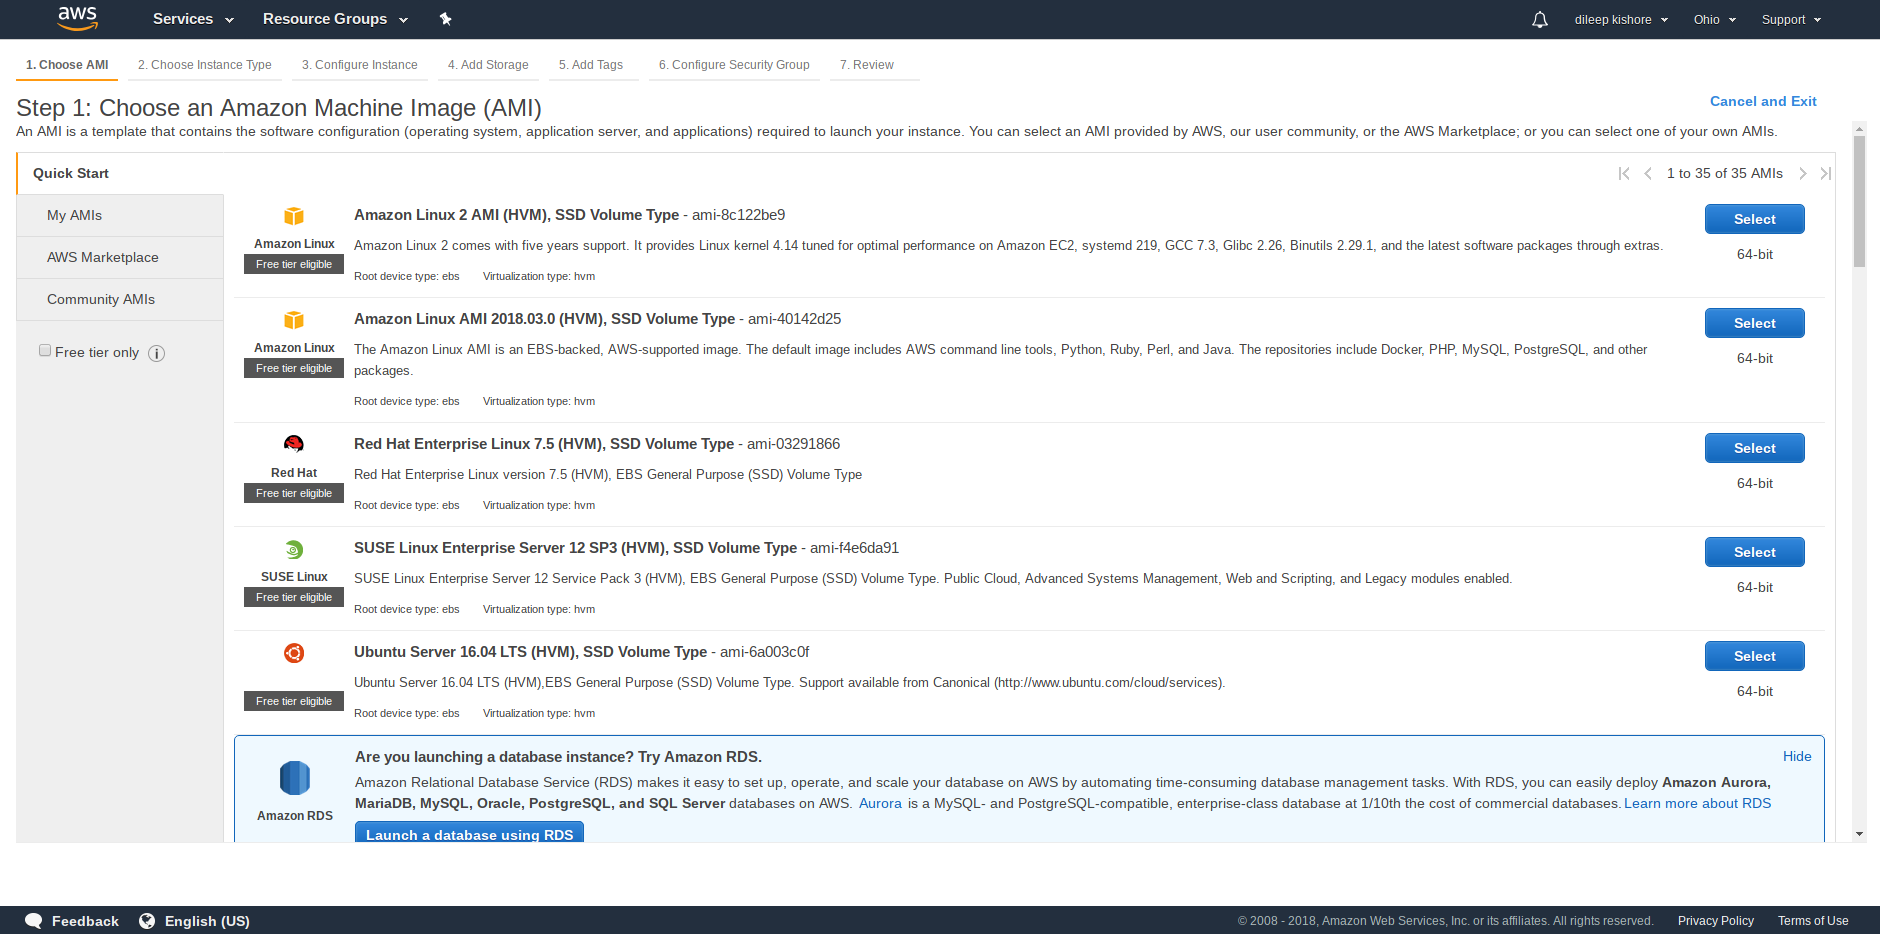
- AMI selection
An Amazon Machine Instance (AMI) is a preconfigured template for launching an instance.
It packages the various applications you need for your server (including the operating system and additional software).
There are four main options when selecting an AMI: Quick Start, My AMIs, AWS Marketplace and Community AMIs.
These options can be seen in the image below on the left sidebar.
Select the desired AMI and then proceed to the next step.
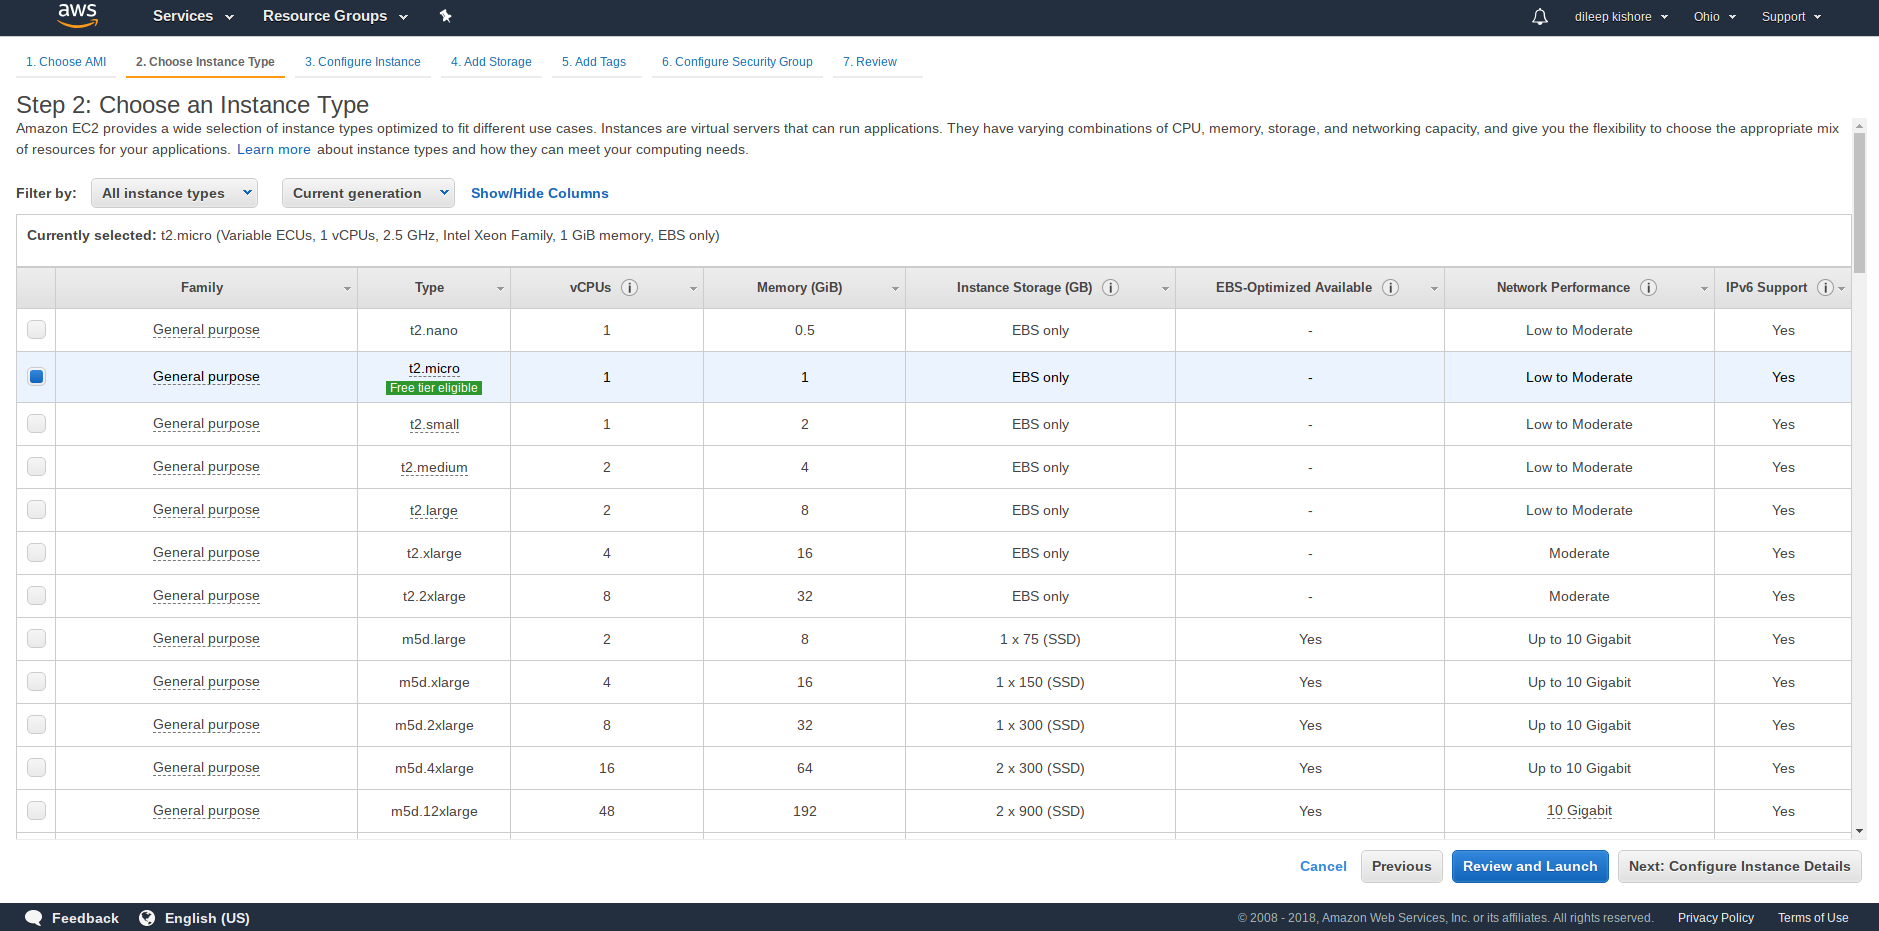
- Instance type selection
Once an AMI is selected, the next step is to choose an instance type.
If choosing an AMI is equivalent to choosing the software you want on your computer then choosing an instance type is equivalent to choosing the hardware.
Broadly speaking the different instance types vary in the number of CPUs, or size of RAM, or storage.
The price per hour for each of the options is not listed here. To get the price of a particular instance, look up the name of the instance on the EC2 pricing list.
Once you are ready, proceed to the next step by pressing the Next: Configure Instance Details button.
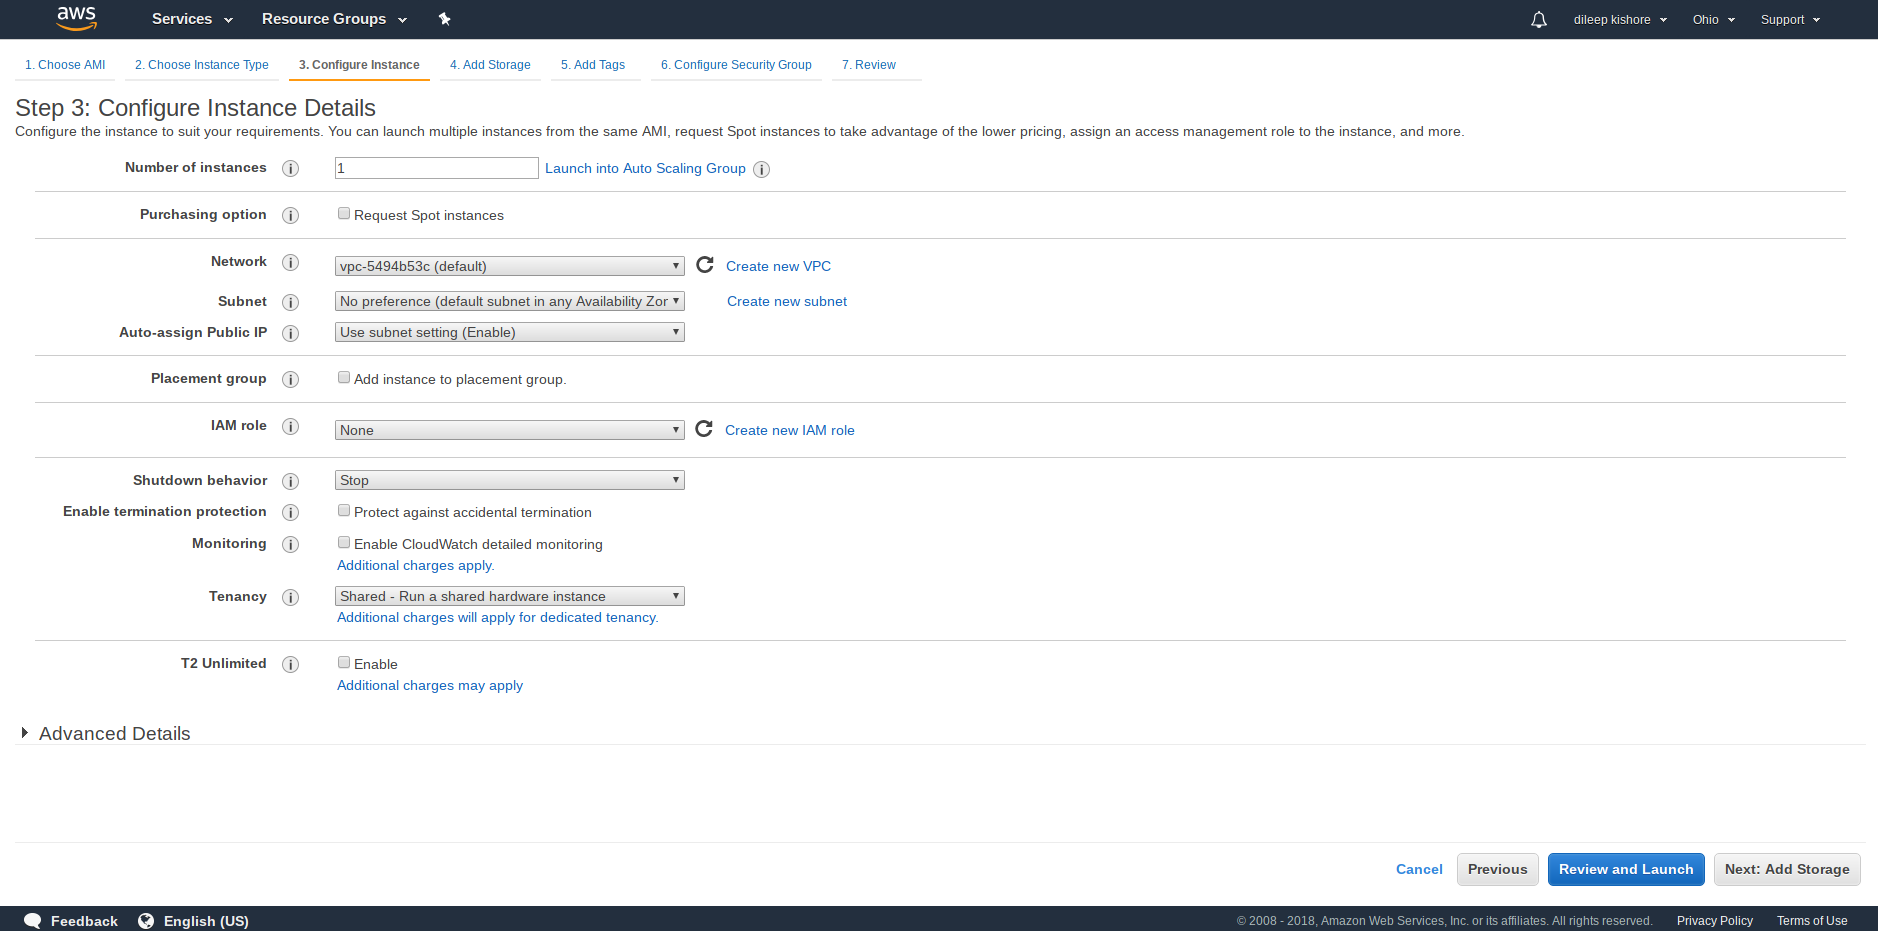
- Instance general configuration
Once you have selected your instance type, the next step is to configure your instance.
This step involves many advanced concepts that will be not be covered in detail in this tutorial.
Using the Number of instances option you can launch multiple instances with the same AMI and hardware configuration at the same time.
Additionally you could also Request Spot instances (spot instances offer spare compute capacity at steep discounts but they are reclaimed whenever EC2 needs the capacity back)
Shutdown behavior determines the behavior of the instance when it is shutdown from within the AMI
For this tutorial we will use the proceed with the default values for all the options.
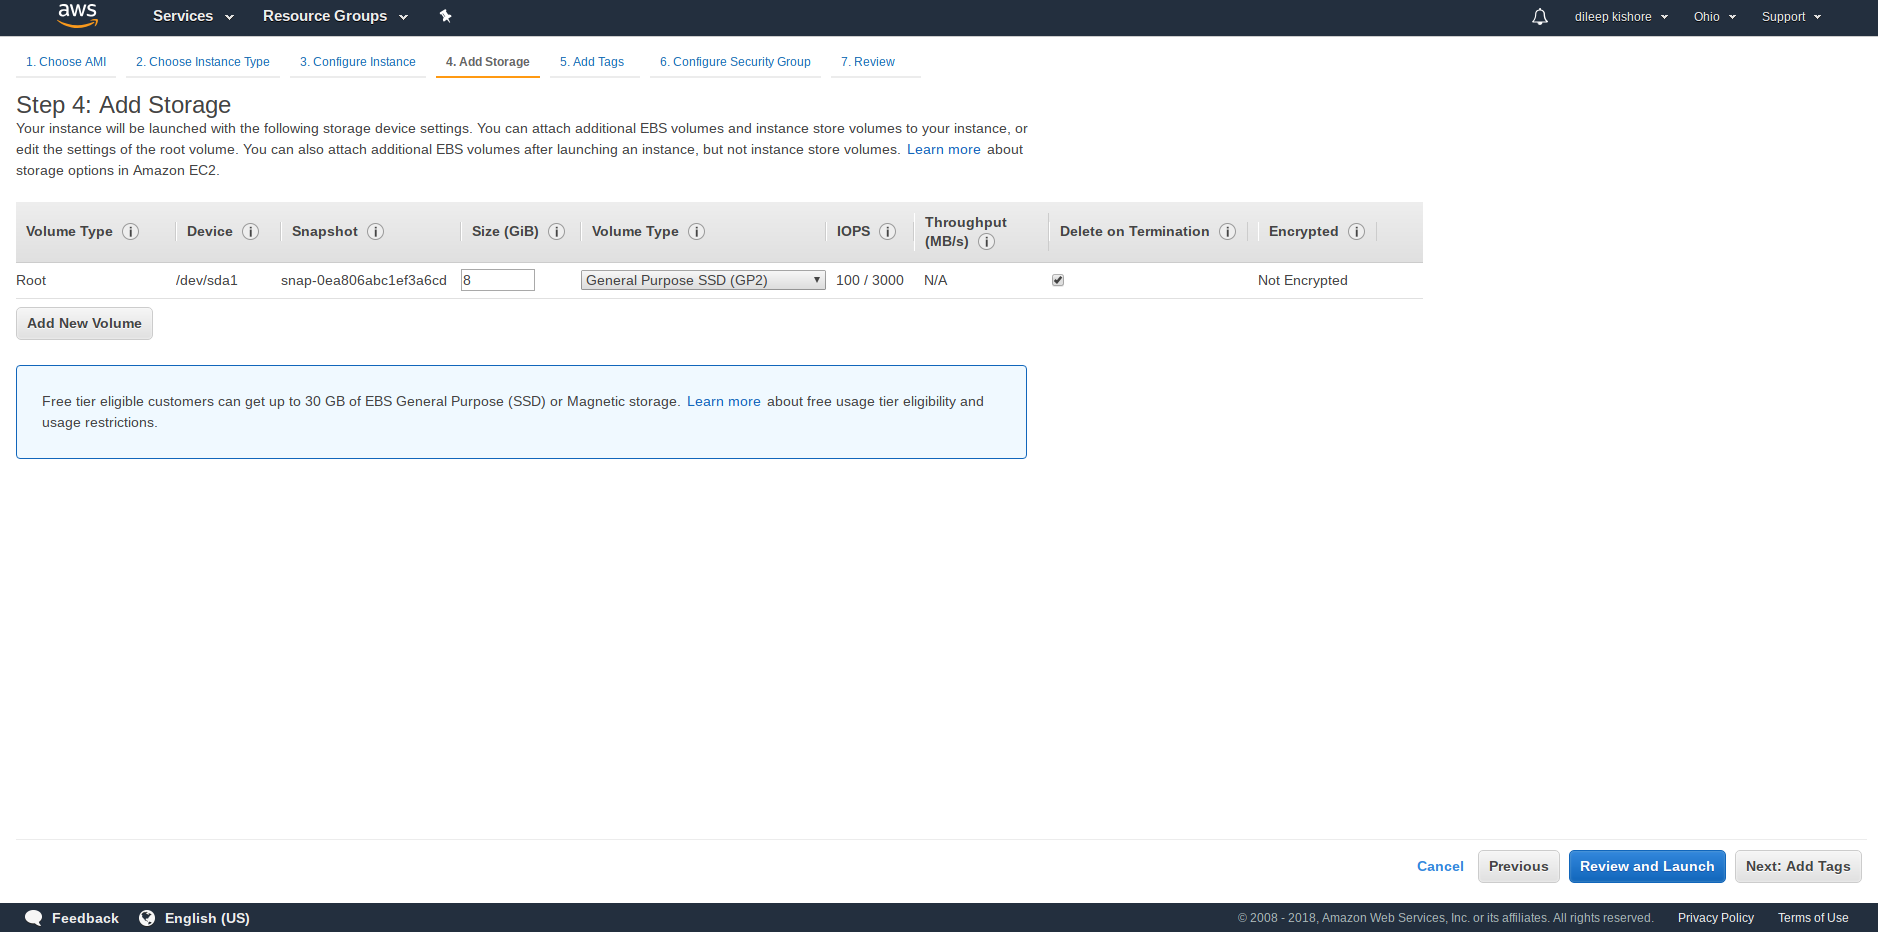
- Instance storage configuration
The next step is to configure the storage that will be available to the instance.
The storage that you start with depends on the type of instance you have selected.
In the image below we have an EBS root volumne with 8GiB size. This is the Root volume where the operating system will exist
By default, this volume is set to be deleted when the instance is terminated, but, this behavior can be changed.
The Add New Volume button can be used to add additional storage to our instance.
- ephemeral or
Instance storestorage EBSstorage
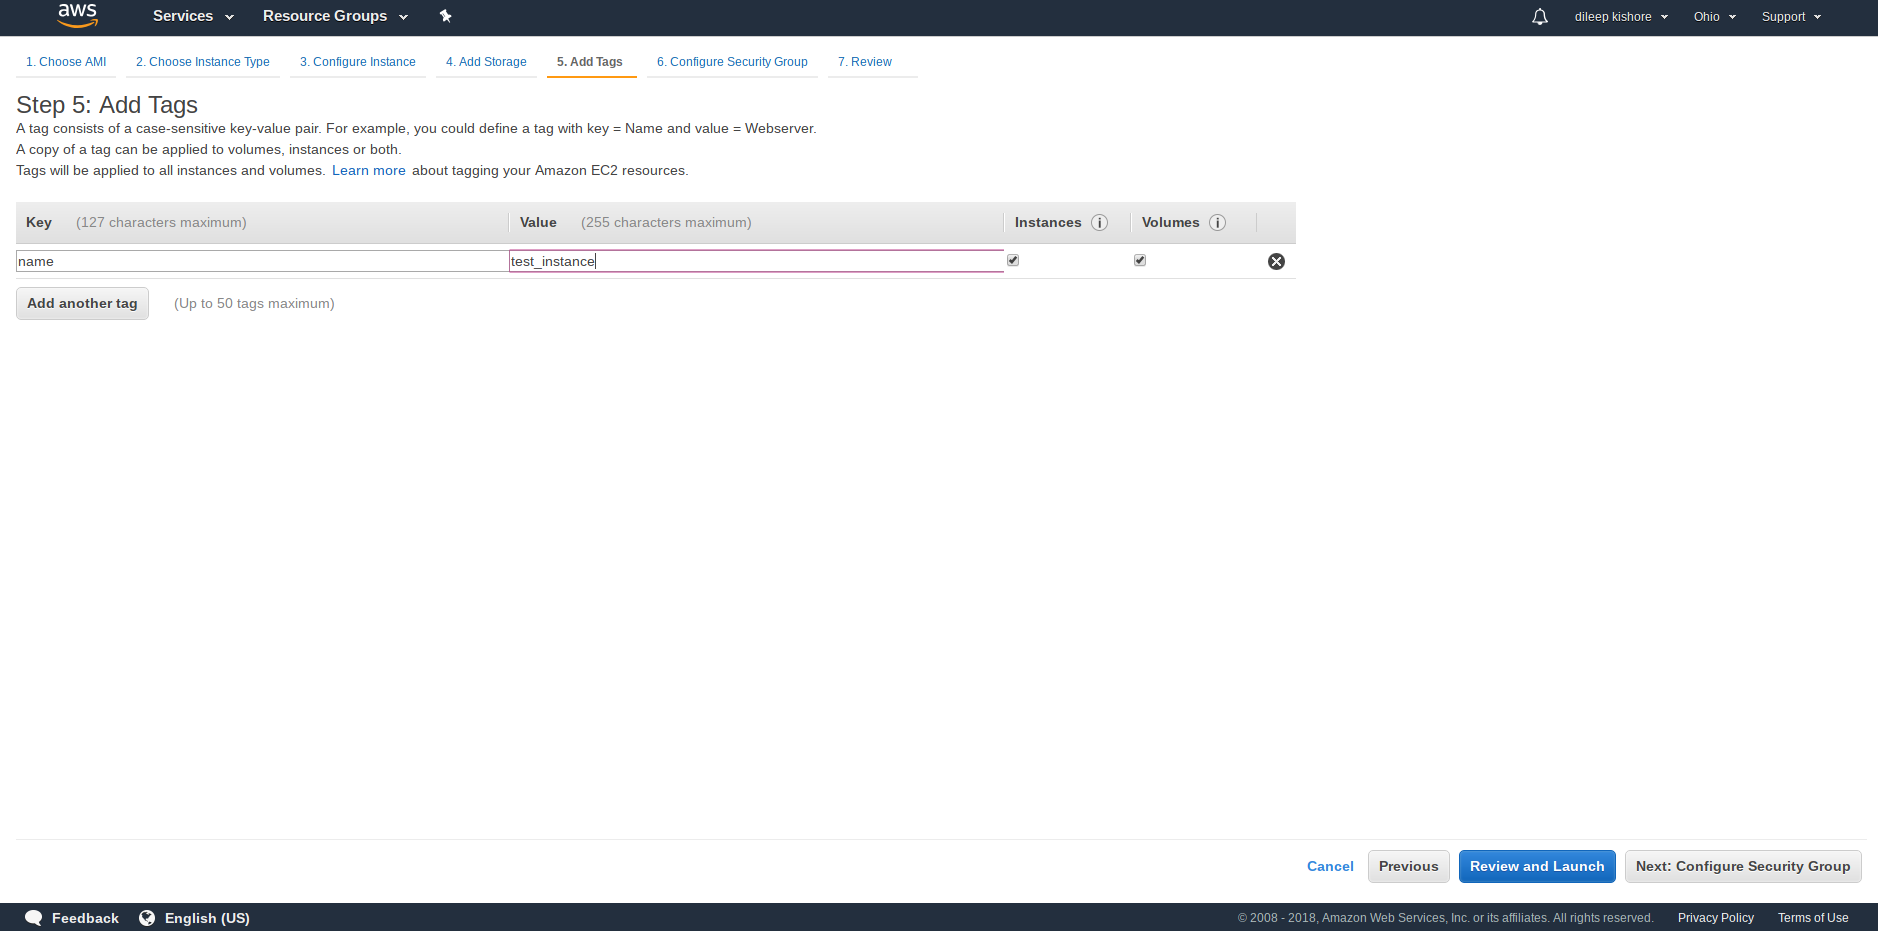
- Instance tagging
When dealing with multiple instances, tagging creates a simpler way to track usage and billing information from groups of related instances
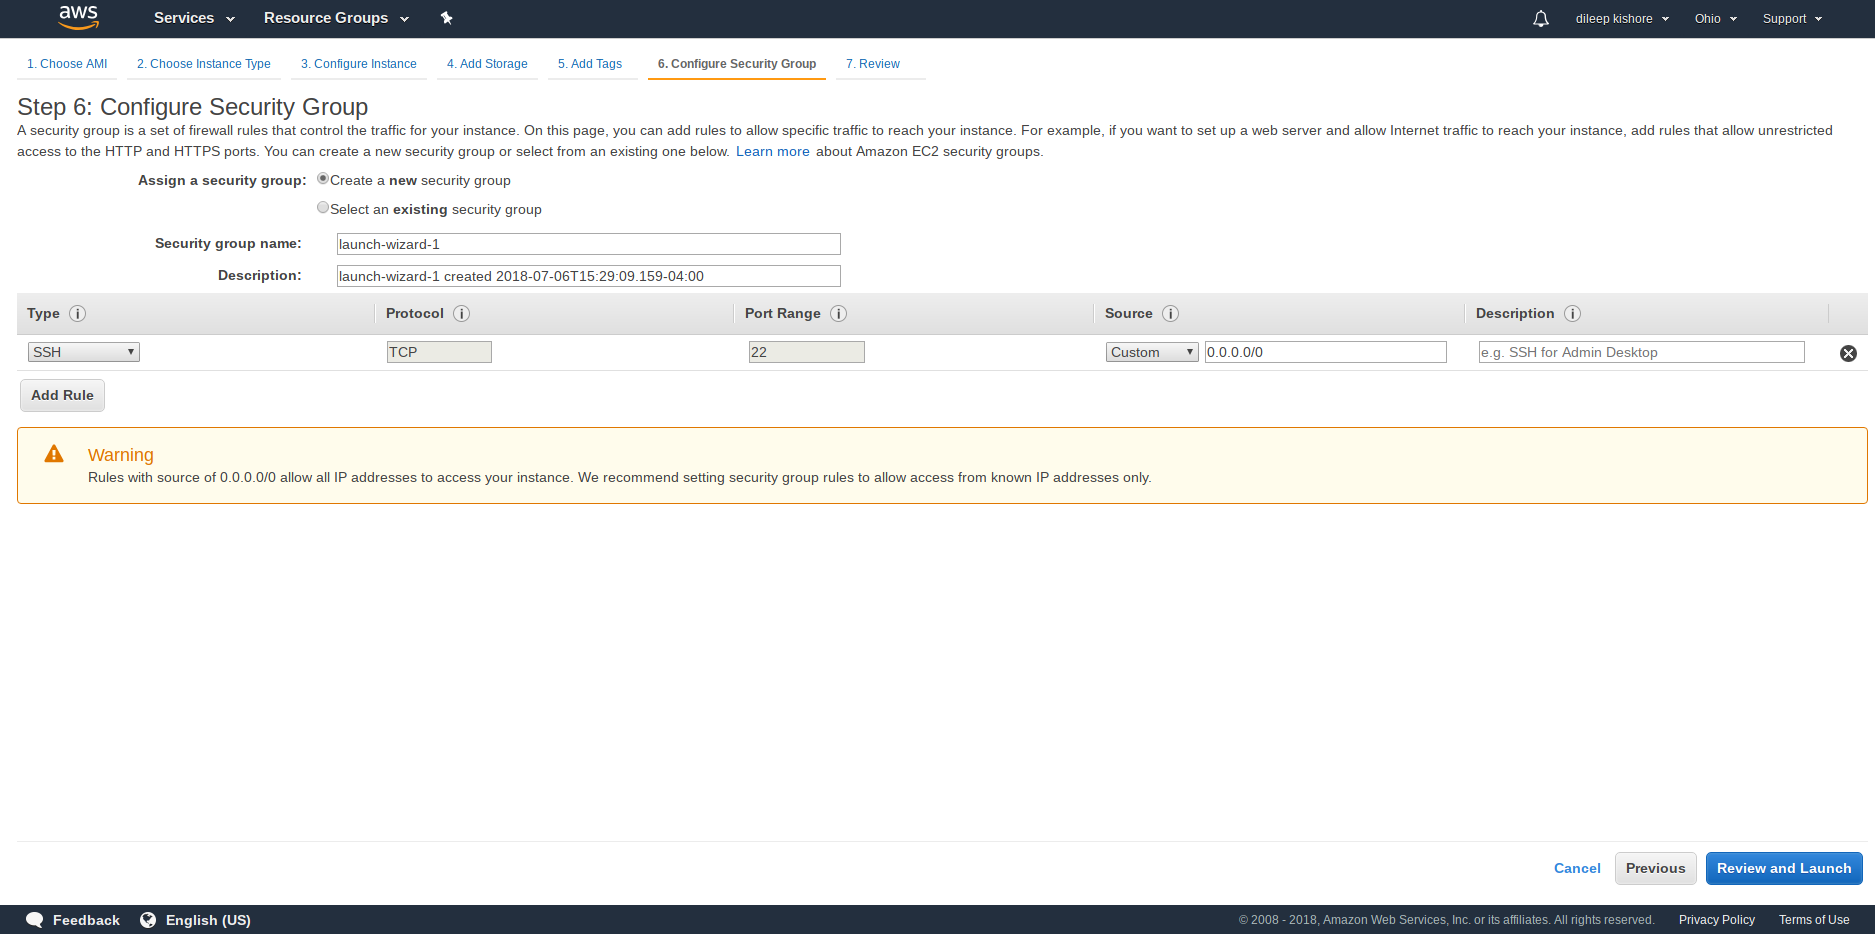
- Instance security
Secure login information for instances using key pairs (AWS stores the public key, and the user stores the private key in a secure place) A firewall that enables you to specify the protocols, ports, and source IP ranges that can reach your instances using security groups
- Instance review
Static IPv4 addresses for dynamic cloud computing, known as Elastic IP addresses
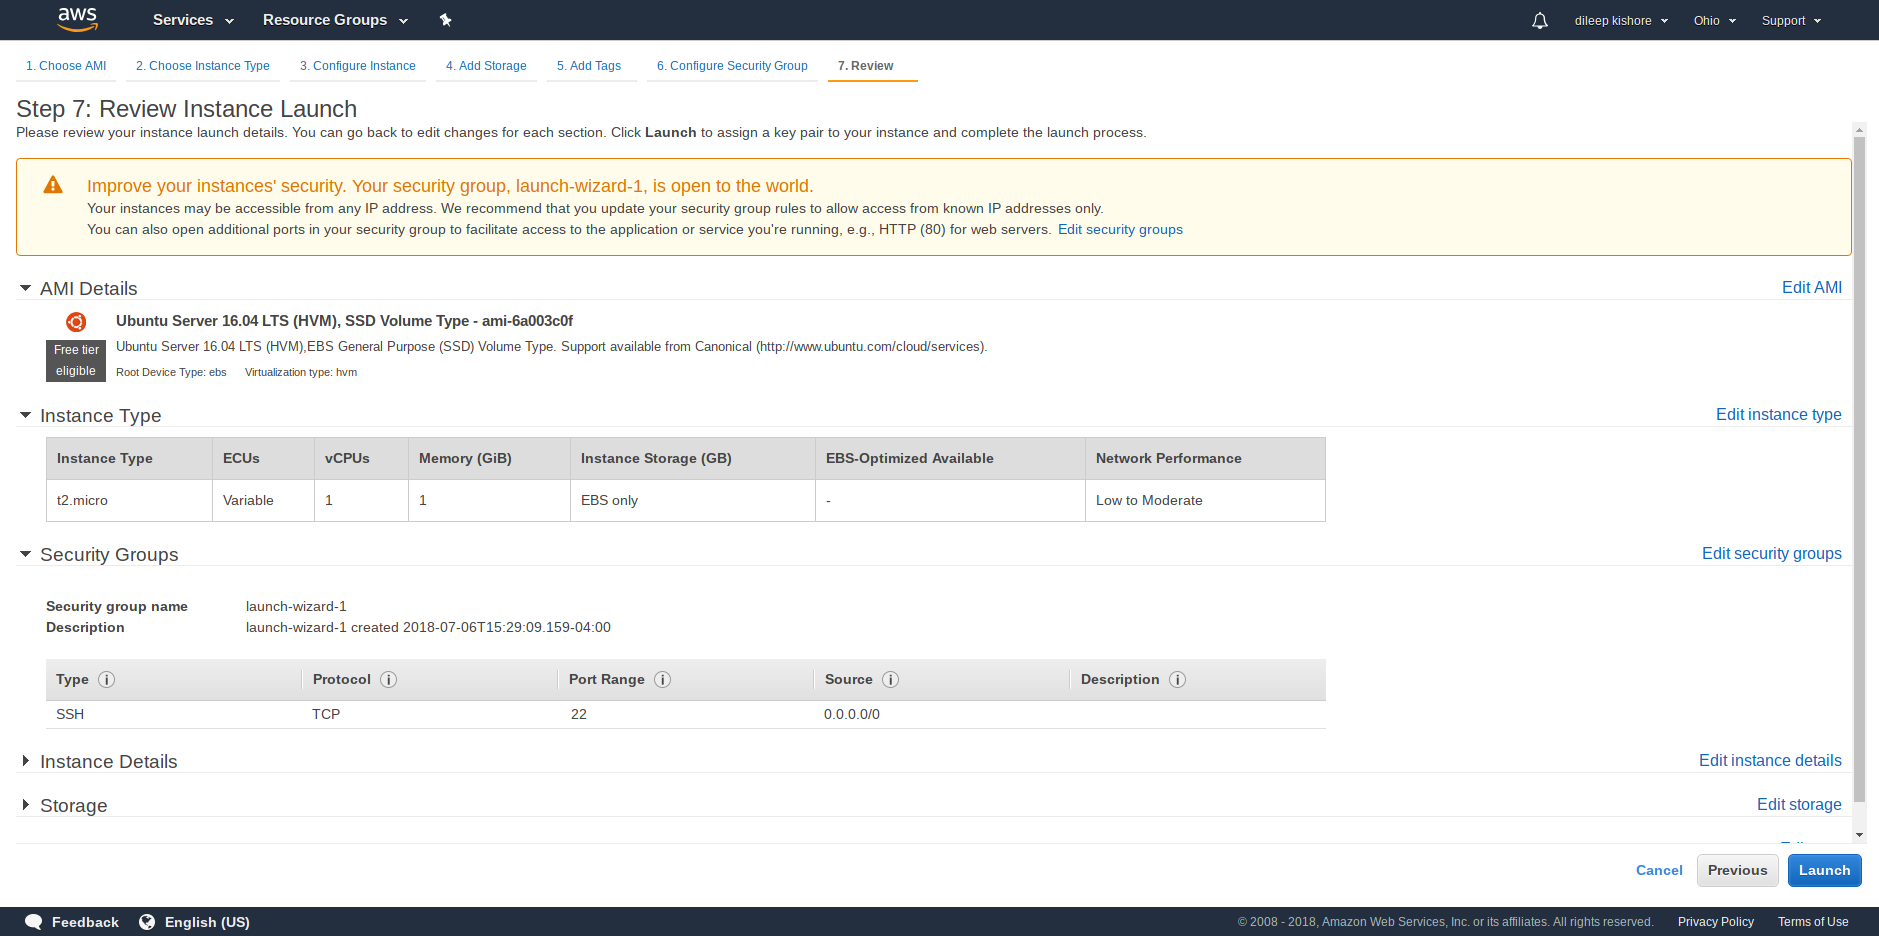
Created instance

Create a key and save it
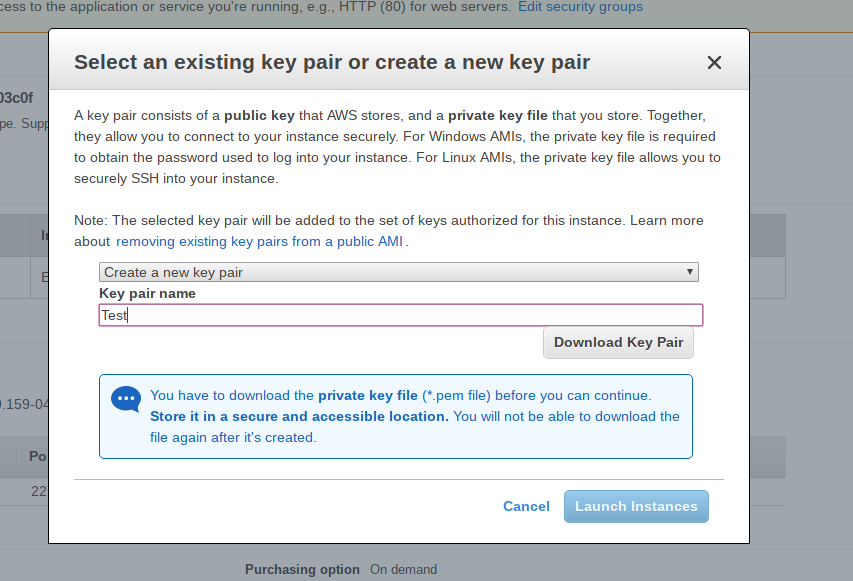
Key file example. The file can be saved as Test.pem
-----BEGIN RSA PRIVATE KEY-----
MIIEpAIBAAKCAQEAhEpF18lIUouMH8qia/BSB70vrQVq/mTTkiRbsACB78rzy3XGRMfvwUseIsGY
H6SDOAFrRlmTrAArH5A0t2TZ8PKrq7b9FtEAvMCeE7rWEiqBblAWiER0k1pbnIqyKJJCo1YRSUs0
oNMdvjB4CUylYraSsSNFYJG5gRwcNhBENLDVnDS79geQcPLu/JeEiJ9V+w+CCYAG40f7li/TuULr
rSy6Oq6jgn2Gy7rrHU7XHU5hcEvxuSeoLb8h/bH1N+cN/H7x3ipEjIDdA2ScCkRXum1V6/kTFQFq
vDG0lqoTlmTNKgDGpb+rdzJgOg/3QX4RSrX/c0W6aFkV9Ib/jQxT+wIDAQABAoIBADAvWXc6wpQG
bjiaN0T3mPlmqHnuEkWs9f8yLQ9TcACmvNwr/tbIuISAVu6z8zP7WSxKIAfU0twAh7SMcxclrdh8
m5kFIvRvlkQqKKnpENY3E0PZ+gsSXB/b9qhzQGdUtt8Fl3BJ61Z07016HA7PEyJ8e7v3q+p7ycTE
N2Zd0GocRIX8zxdRo9GS8ouS0QcFgNF8KblzlJ6Vs0gI7o7mIRZIm9vWkuR9Lp9uEPD2flUIvN3z
yRmY/FE/R1yc76Uq+g8eywifRAh+GFyyO8PmFoYRni4Ki6+tEIFaq5JauT0JJF66EZeZP8ZKoWm9
1K30Ucti2D5l8t+CpbBM5JxhmjECgYEAxz1ET42F1sBGYqNn5hmfjrRp+YF3EYz2awRSibOeerpJ
Bh1QZeB7/QD3wcB00XFiMu/3haP9xs4eesjSSug+1F59nyzDplNsybz1sYpUQwP9LjX0loUCIb8r
3O2VdLJ5ZJ9dfNgpStC/wi7kkr8xjK5XiHgP6DLk6+H1Lr2d+kMCgYEAqfpUseZ/sm1vYt80LlWI
r8ozsUmzuISRspGVUppyDD47Iyj/1mkiWnsFDDl07oBcFIUFIEd1rkJNB3gXKSr76kcY0X4lav7a
0dvse2T9PC/pLSFkax9UjVnydCN8ElyNoXI2wT5HuLDjjCmHBD/4E9ZOO201JICSbRxaykl17+kC
gYEAxRiWuxwFiqwq9Okxny856LIRJAIvB+2q17Mu84n8/OvL0YCuSBoKjf6nGcSJy6eevUUmV84i
/sho3o5Lek7F2NCg9RYTdjaRKAEGDNwK/0Cy9UPq8fwiX7/+ZE+jyg3EiQYeNaKhNqHLEQ3SkFkT
a1gMv7QGCG5QiAi/w71QyoECgYARcn+VDyrWXsNLK8wIYYE5QhESRpVrADiQUr84DmBcf1rEniW8
lWgQT4ZSHeexv300If9Hs+4RZ/7OIHaIJEBdaNTUVBV1KRm+5sscU15m+if+GOpc0Id2RuBLKYVH
wTZMdxPFvCXSgF2q+mxAdGx7ZMj88pW83HGrP3jWQLoZWQKBgQCX5jxy3QXlPpwDppqwKKBQ8cGn
YDDQHCeD5LhrVCUqo5DCobswzmGKU/xEqYsqlk/Mz1Zkvg4FbJwJDgQGkSyAu071NLi0O6w27dm+
UHuvF5mCDdAHWirFUBSiebxOpEQnkZ9IPXUUCSC6IQvPFbdGN8G3WjoER6Lw121Q4rJxGA==
-----END RSA PRIVATE KEY-----